Wednesday, December 22, 2010

Crochet Hook Holder

Pin It

I made this Crochet Hook Holder a while ago, 
and unfortunately I didn't take pictures of the process. 
But it was pretty simple, I used the idea for a basic crayon roll, 
there are several available online.

I just made it up as I went. I left a big pocket on the left side, 
where I can put some embroidery floss and small scissors. 
I don't have that many different hooks anyway, 
so for me there was definitely no need to have that many pockets.
Also, I used felt for the backing. That way it is padded, which makes it more firm, 
and I also can stick some normal needles in there, and they will just stay where they are at.

With the floss, needles, scissors and hooks all together in my holder, 
I have everything I need to crochet some cute flowers, right at my fingertips.

If you are interested in making one for yourself, you can buy the pattern in my
Etsy Store No time to be bored: The Etsy Store.

Pin It

Thursday, December 2, 2010

Owl Hair Clips

Pin It


I bought some cute owl fabric.
So I thought I would make some owl hair clips to match the skirt I am going to make.

They are very easy to make.
I cut the pieces out of felt, stitched the tummies by hand, used seed beads for the eyes,
and then I used my glue gun to glue all the pieces together.

I wish the skirts came together as quickly...

I linked up to:

Sumo Sweet Stuff

Pin It

Wednesday, October 13, 2010

Ladybug Halloween Costumes

Pin It

This was my first sewing project ever.
Two years ago, I decided to get brave and finally put the sewing machine, that my hubby gave to me years ago for my birthday, to use.

I bought some fabric and decided I couldn't go to wrong with something that would only be worn one night. I just made up the pattern as I went, and my girls LOVED their costumes. I made them large enough, so even now it's 2 years later, they can still wear them. Unfortunately, they don't want to be cute ladybugs anymore, but witches...

(And no, I'm not making them witch costumes, but last year I bought a few costumes at Target when they were 75% off as dress up clothes, so they will be using these...)

Basically these are just like a skirt with elastic on top AND bottom, and also part of the sides not sewn together, to leave room for armholes. I lined the fabric, because it was pretty thin. Hardest thing for me was to zigzag around the dots, because I wasn't good at sewing curves. (Still not my favorite thing to do!) We paired it with black hooded sweaters and black tights and were good to go!

Pin It

Wednesday, September 29, 2010

Fall decorating

Pin It


I love fall and decorating for fall!

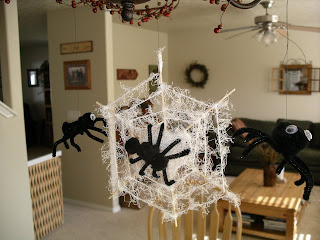
We made these spiders and the spider web a couple years ago,
and since the kids love them so much,
we have used them every year since!
Some outside decorating, too.

Pin It

Wednesday, September 22, 2010

Simple Skirt

Pin It


Just made this little skirt.
As simple as it can be.
But cute, because the fabric is cute.
Perfect for fall.

(If you would want to make one like this,
just follow the directions in this tutorial,
without the extra layer on top.)

I linked up to:

Pin It

Friday, September 10, 2010

Bead Cup Tutorial

Pin It

I was washing some clear plastic cups to put in our recycling bin, but then it occurred to me that I could use them for a cute little craft. So instead of throwing them away, I kept them.

Today I made them a lid and filled them up with beads. These make cute party favors, or work nice as little gifts on a trip, or when your little girl is sick.

I have a shoebox around that I fill with little gifts and fun things like this, and things I find at the dollar store. When the kids are sick, or when we go somewhere where they need to be entertained, all I need to do is get something out of that box. It works great!

Anyway, back to the bead cups! I made these bead cups and took some pictures during the process. Have fun!
The containers I used were empty containers from Crystal Light and yogurt.
Basically any small clear container with a flat edge on top works.
Wash and dry the containers thoroughly.
Some of them may have an expiration date printed on them, make sure you remove that too.
Trace the top of the container onto cardstock.
Fill the container with beads. I put bigger beads (for smaller hands) in the big cup, and small beads in the small Crystal Light cup.
Then, I added some pipe cleaners to the big cup, and different lengths of wire to the small cup. I found that pipe cleaners work GREAT for little kids. Once the bead is on there, it doesn't tend to slide off so easily.
Next, I decorated the cardstock circles I cut.
(Wait to put on the rhinestones, or other bulky embellishments, you'll see why.)
I used Elmer's white school glue to attach the lids to the cups.
I found that it helped to put the cups upside down while drying, to make it stay in place.
In order to do that, I had to peel off the rhinestones I already attached in the picture above.
So that's why you had to wait on those!

And there is your adorable little gift!


I linked up to:
It's a Blog Party Show and Tell Green Join  us Saturdays at tatertotsandjello.com for the weekend wrap up         party!

Pin It

Wednesday, September 8, 2010

Pocket Calendar Transformation Tutorial

Pin It

I like to have one of these little pocket calendars in my purse, so that I can keep track of appointments and stuff when I am on the go. This one was pretty plain, so I thought I'd give it a make-over. It's fast, fun and easy, and this is what I came up with:

Supplies needed:
  • Pocket Calendar (duh)
  • Patterned scrapbook paper (one large enough to cover the whole outside, plus a little extra so that it can be folded around the edges)
  • Paper trimmer
  • Glue
  • Ribbon
  • Clear nail polish to finish ribbon
  • Optional: other materials, like flowers and rhinestones to embellish


First, remove the plastic cover of the planner. If you plan on decorating with several layers of paper, trim the outside edges of the original planner cover a tiny little bit. This will give you more room to work with, and makes it easier to slip the cover back on.

Then, cut a piece of paper the same height as your planner. Lay the planner open as pictured, and make sure you cut the width a little larger than the planner, so that you can fold the edges around the original cover.


After that, take a piece of ribbon, about 1.5 times the height of the planner. Glue it to the paper you will use as the cover as shown in the picture.


Then, glue the paper around the cover.


Finish the end of the ribbon with some clear nail polish to keep it from fraying.


Use other papers and embellishments to decorate your planner.


Then you can slip the cover back on, and you're done.


I linked up to:

Show and Tell Green Get Your Craft On Tuesday

Pin It

Monday, August 30, 2010

Emery Board Holder

Pin It

I used this tutorial at Sherry's Simple Blog to make this cute emery board holder. This would make a nice little gift. They are easy to make.
I made a couple small adjustments. I used velcro as a fastener instead of buttons. Also, I decided to decorate it with flowers. Love this quick, cute craft!

Pin It

Tuesday, August 17, 2010

Flower Cupcakes

Pin It

It's so easy to make these white chocolate flowers.
I just melted vanilla chips in the microwave, stirred it, put the melted chips (careful, that is HOT!!!) in a Ziploc baggie, cut off a small corner, and created flower shapes on wax paper. Then, before it got hard, I put some sprinkles on the flowers.
Once they are hard (that goes pretty fast) you can use them to decorate the cupcakes. You could also make them ahead of time.
A very easy way to make simple cupcakes look really cute!


Pin It

Thursday, August 12, 2010

Kids room toy organization solution: Picture Tags

Pin It

Sometimes the mess in our playroom drives me up the wall.
Often, everything that is in the boxes pictured above is laying on the floor.

I have learned that kids like to dump boxes of toys on the floor.

I used to have a "theme" for things that belonged in every box,
but most of the time we end up just stuffing toys in the boxes,
just making sure they are not on the floor.

But that doesn't really help much, because next time when they are looking for something,
they end up dumping everything on the floor again.

So I got this idea, nothing genius, but hope it will work:
I labeled the boxes, so that they can see what belongs in there.
Not just that: we organized the boxes,
then I took a picture of the contents of the box.

I made tags using these pictures, so that my kids (who can't read yet)
can see what belongs in which box.

I uploaded the pictures to my computer,
and used Photoshop to add a nice background and titles.

I printed and cut the tags.
Then, I used clear packing tape to laminate the tags.
With a hole punch I made holes in the tags.

Then, I had my girls match the labels with the right box,
so that they would get the idea.

They did great!

We tied the tags to the boxes with ribbon.


And, now I hope I won't find all these toys on the floor anymore :)
So far, so good...
I linked up to:


Organize and Decorate Everything

Pin It