Showing posts with label hair accessories. Show all posts

Wednesday, July 3, 2013

Red, white and blue flowers and pinwheels

Pin It

I have a ton of pictures on my computer of things I made in the past weeks (or months even).

Just not much time to post them.

But thought I'd share a couple things I made this week...


Some patriotic pinwheel cake toppers.
So simple, but festive and cute...


And some red, white and blue hair clips.
We just disassembled a bunch of plain flowers, and re-assembled them in colorful combinations.

Happy 4th of July!


Pin It

Thursday, April 12, 2012

Crochet hats, flowers, owl and sweater

Pin It

Here are some crochet projects that I have been working on.
I haven't had much time to post pictures, so here they are all at once :)


Some hair clips for a little friend of my girls


A baby hat for a friend


A monkey baby hat


A baby headband with a rose


I used this pattern to make this little owl.
It's simple and cute.

I used the pattern for the body, and then did my own thing for the eyes and beak.


A navy cardigan for our youngest:
(I started out with a pattern, but modified it so much that it turned into my own...)
I really love to crochet.
It's relaxing, and so easy to take with you...
I can't really sit around doing 'nothing', so it's nice to have a 'portable' craft to work on.


Pin It

Thursday, February 16, 2012

Flower & Lace Hair Clips - Tutorial

Pin It


Let me start by saying this is a super easy & quick project!
(No glue needed, no sewing, just fast & easy.)

So no excuses not to try this :)

Begin by gathering your supplies:
* Lace 
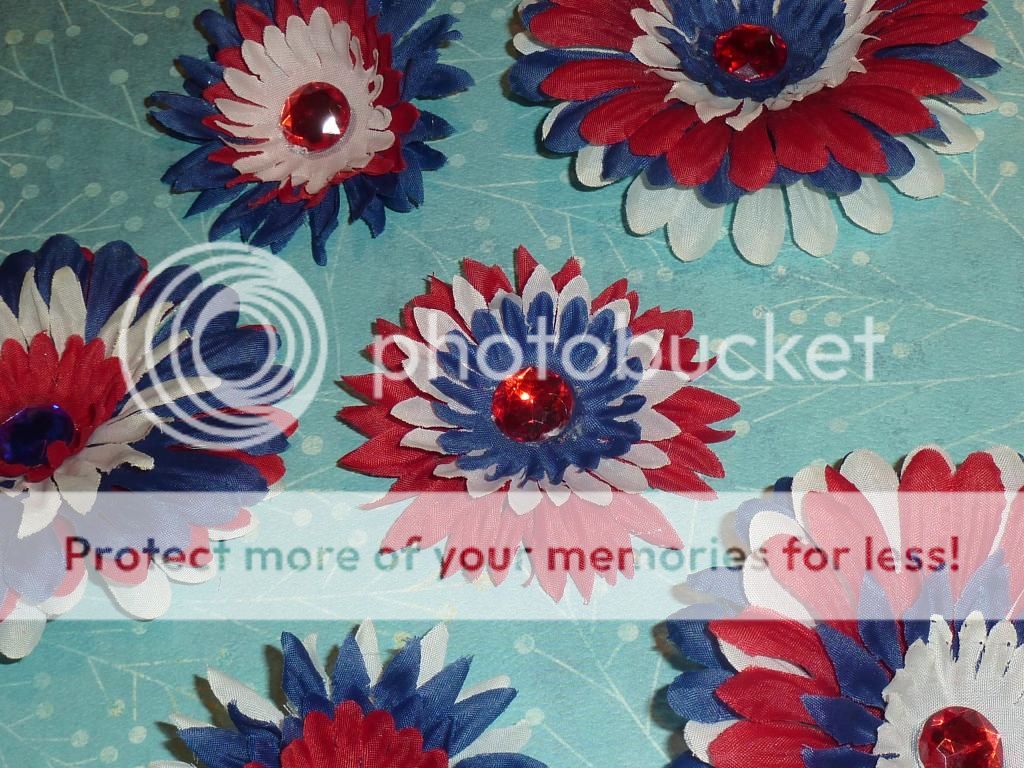
* Flowers (You want the kind that comes apart, like most of them do)
*Brads (preferably with long legs)
*Alligator hair clips (The one with an opening in the center, as pictured)

The only tool you'll need are scissors...


Begin by taking your flower apart as pictured below.
Take off the plastic piece in the back, and separate your flower.
You might find some plastic pieces in between, you won't need these...


Next, cut a strip of lace, and poke your brad through the end as pictured below.
Then, start pleating or folding your strip, and push the brad to each pleat to keep it in place.
Work your way around.
If your strip is too long, you can trim it, if it's too short, just add another one.


Slip the smallest of your flowers on the brad behind the lace center you just created.
Then, cut a piece of lace about the same size of that flower.
Fold it as pictured (double it twice).
Trim the corners.
Open it, you created 4 petals.
And repeat once.


Now, slip these 2 pieces of lace onto the brad, as pictured below.
Then, add the next flower (one that's bigger than the previous one).

Keep repeating by layering lace and flowers till you have the desired result.

You can trim the lace if you want to.

Then, take your alligator clip.
Open it, and slip your brad through the top prong as pictured below.
Fasten your brad by bending the legs.

And you're done!


Now, if you are worried that the flower could come off,
or if you think this is just TOO simple, 
you could use your glue gun...
(But I have used them just like this and it usually works just fine.)

But for gift giving or for little girls to wear them, I prefer to have them a little more secure.

In that case, you can secure the brad by putting a little glue on top of the legs of the brad.

Or you can go all out and glue some felt on top of the brad and then glue the alligator clip on top of that.


Now, enjoy your beautiful hair clips.


Pin It

Saturday, November 5, 2011

Baby gift

Pin It

I found this cute dress for a friend of mine who had a baby girl.

I love the color combination, and decided it needed something to go with it.


So I made her a couple of hair clips in colors that match the dress.

I cut some felt into flower shapes, using my Big Shot.

Glued them on alligator clips with my glue gun, and added a rhinestone.


And a matching card.


Pin It

Tuesday, March 22, 2011

Easy Flower Hair Clip Tutorial (No Glue and No Sew!)

Pin It

I know that there are a lot of tutorials out there in blogland showing how to make flower hair clips! But a couple weeks ago my daughter attended a birthday party, and she got the cutest flower hair clip as a party favor. The mom of the birthday girl showed me how she made them, and I was very impressed with the fact that this is SO fast and easy to make - probably one of the fastest instant result projects I ever made! 

So I am not claiming this project as my own idea, but since I really liked this super easy and speedy project, I just HAVE to share this :)


 Ready to make one?


Gather your supplies (this is the most time consuming part, I just happened to have everything laying around):

Alligator clip (Use the one with the opening in the middle as pictured above, not the 2 pronged ones or your flower will slip off)
Brad
Gerbera Daisy 

 Disassemble the daisy, usually they are somehow kept together in the center, just take the stem off the flower, and remove the center of the original flower.

Insert your brad through the hole in the center.

Stick the brad through the top opening of your alligator clip.

Open the brad to attach the flower to the clip.

And THAT'S IT!


Couldn't be easier, right?

I attached the hair clip to a crochet headband, so you could use the hair clip this way too...

I linked up to Sumo's Sweet Stuff.

Pin It

Thursday, December 2, 2010

Owl Hair Clips

Pin It


I bought some cute owl fabric.
So I thought I would make some owl hair clips to match the skirt I am going to make.

They are very easy to make.
I cut the pieces out of felt, stitched the tummies by hand, used seed beads for the eyes,
and then I used my glue gun to glue all the pieces together.

I wish the skirts came together as quickly...

I linked up to:

Sumo Sweet Stuff

Pin It

Tuesday, March 30, 2010

Refashion: Turn long-sleeved turtle neck into ruffled t-shirt and headband

Pin It

I found some cheap turtle necks this weekend at a sale, and decided to buy them and change them into t-shirts for this summer. This is a great time to buy cheap winter clothes and change them, or use winter clothes that you already have on hand before your child outgrows them!

I started by cutting off the sleeves and the turtle neck itself. To make sure you cut both sleeves evenly, cut off one sleeve, turn it over and put it on the other long sleeve and use that as a guide to cut the other sleeve.

Next, you are going to cut the new neckline. I used a small plate and traced it. Be careful not to cut it too low, since the weight of the ruffles that you are going to attach will pull it down a little further.

Next, zigzag the edges of the new sleeves, I used stitch length 1. The sleeves will end up looking 'curly' like they are in the picture.

Then, use one of the sleeves you cut off, and cut it into strips. My strips were just a little narrower than an inch. You will probably need 3 or 4 strips.

Next, using a straight stitch, the longest one you have, stitch straight down the middle of the strips. Gather the strips, so that a ruffle is formed. Pin the ruffled strips onto the shirt, so that they overlap one another.
Sew the ruffle onto the t-shirt with a straight stitch. (I used length 2)

And the shirt is done!


Next, we're going to make this cute headband using the neck of the shirt... (Can't let anything go to waste, can we?!)

In order to make the flower, find a strip of fabric, about 3 inches wide and 16 inches long. Fold it and sew with the longest straight stitch on your machine. Then, pull the strings at the ends to gather the fabric, as shown in the picture below.

Roll up till your flower has a shape you like, tucking in the ruffled ends.
Then, sew by hand to create the flower.
Next, sew the 2 edges of the turtle neck together, and turn that to the inside of the headband. Attach the flower to the headband (you can sew it or pin it so that you can change it later) and you're done.


Pin It