Tuesday, March 30, 2010

Refashion: Turn long-sleeved turtle neck into ruffled t-shirt and headband

Pin It

I found some cheap turtle necks this weekend at a sale, and decided to buy them and change them into t-shirts for this summer. This is a great time to buy cheap winter clothes and change them, or use winter clothes that you already have on hand before your child outgrows them!

I started by cutting off the sleeves and the turtle neck itself. To make sure you cut both sleeves evenly, cut off one sleeve, turn it over and put it on the other long sleeve and use that as a guide to cut the other sleeve.

Next, you are going to cut the new neckline. I used a small plate and traced it. Be careful not to cut it too low, since the weight of the ruffles that you are going to attach will pull it down a little further.

Next, zigzag the edges of the new sleeves, I used stitch length 1. The sleeves will end up looking 'curly' like they are in the picture.

Then, use one of the sleeves you cut off, and cut it into strips. My strips were just a little narrower than an inch. You will probably need 3 or 4 strips.

Next, using a straight stitch, the longest one you have, stitch straight down the middle of the strips. Gather the strips, so that a ruffle is formed. Pin the ruffled strips onto the shirt, so that they overlap one another.
Sew the ruffle onto the t-shirt with a straight stitch. (I used length 2)

And the shirt is done!


Next, we're going to make this cute headband using the neck of the shirt... (Can't let anything go to waste, can we?!)

In order to make the flower, find a strip of fabric, about 3 inches wide and 16 inches long. Fold it and sew with the longest straight stitch on your machine. Then, pull the strings at the ends to gather the fabric, as shown in the picture below.

Roll up till your flower has a shape you like, tucking in the ruffled ends.
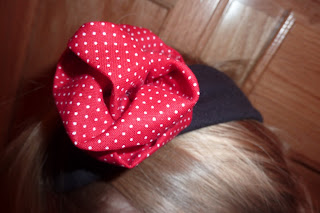
Then, sew by hand to create the flower.
Next, sew the 2 edges of the turtle neck together, and turn that to the inside of the headband. Attach the flower to the headband (you can sew it or pin it so that you can change it later) and you're done.


Pin It

Tuesday, March 23, 2010

Colorful Clowns

Pin It

Recently I ran into a cute, Bulgarian website, called Krokotak. They have lots of great ideas, and thanks to Google Translate, I am even able to understand what they're writing.


This cute clown is one of the things I found there, it's a coloring page, in the shape of a circle. Once the picture has been colored, you can cut them out, and transform them into a 3-dimensional clown. It's just one piece, so no glue needed. Such a neat, smart craft!!
The download can be found here:
Let your kids color the pages.
Let them cut it out, only the black/white stripes, see picture above. (Younger kids will need assistance here.) Twist the legs and arms tightly, uncolored side of paper inside.

Let the clowns play in the yard!
These would make a really cute garland for a clown-themed kids birthday party.


I linked up to It's Our Long Story.

Pin It

Thursday, March 18, 2010

Pineapple Orange Smoothie

Pin It

I really enjoy this drink, it's so simple, I just made it up last week, but am sure this is going to be one of my summer favorites this year. My kids like it, too! Can you tell I am ready for a change of seasons??
INGREDIENTS
  • 20 oz can of pineapple (in 100% juice)
  • 2 cups of ice cubes
  • 2 cups of orange juice

Put all ingredients in the blender.

Cover and process for 15 seconds or until smooth.

Enjoy!

(Variation: you could add a banana too, for extra vitamins, flavor and sweetness...)

Pin It

Spring is almost here...

Pin It

My husband was pruning trees this past weekend, and when I saw the branches, I suddenly got the idea of putting a bunch in a vase.
These are from our apple tree, I really like the look of it, and can't wait for blossoms to show up!

Pin It

Sunday, March 14, 2010

Great Scrapbooking/Paper Crafting Find!

Pin It

See what I found at Big Lots! This is called a "Paper Crafting Pack". It contains all kind of stickers, rhinestones, scrapbooking papers and other accents. And the prize??? TWO DOLLARS! Can you believe it? I hardly could, and they had quite a bit of it at my Big Lots a couple days ago. Today, they had an ad with the paper, and it was advertised in there. They had all different packs, it's packaged in a plastic bag, but by shaking stuff around, you can get a pretty good idea of what is in there.
Since I always LOVE a good deal and think I'm not the only one, I thought I'd share. This was in my pack:
3-D vacation-themed stickers. Very cute, I especially like the rubber flip-flops!

A box with 24 epoxy accents. Very cute, it looks like chipboard, but a little more shiny. And, I love the forest theme!

Shiny accents!

Pretty stickers and some text rub-ons.

And last, but not least, a scrap pack, 10 sheets of 12x12 patterned paper and accent punch outs. I took a picture of the back, where they show how to use it.
Oh, and there was also a pack of letter-shaped sticky notes in it, which I gave to my kids to play with, so that's not in the picture.
Not bad for $2, isn't it?!

Pin It

Thursday, March 11, 2010

Layered Skirt Tutorial

Pin It

I just made this skirt, actually I made two of them, and thought this second time I would make a tutorial and take pictures to illustrate my steps. It is a very simple skirt, but by adding a layer on top, it just gets something extra! And it is so easy! This would probably work for a girl's skirt up to size 5T. All you need is 2 coordinating fabrics, and not too much of it, depending on the size.
Are you ready to make one, too? Let's start!
1. Begin by measuring the length of a skirt that fits your girl well. Add 2.5 inches for the seam allowance. Cut off that amount of fabric needed. (My fabric is doubled here, the finished edges are the vertical lines.)
2. Zigzag both raw edges.
3. Stitch finished edges together with a straight stitch, right sides together.
4. Press a small seam on the bottom (1/2 inch) and a bigger one on the top (2 inch), the top will be the tunnel for the elastic.


5. Stitch the bottom seam.
6. Stitch the tunnel for the elastic. Make sure you leave an opening to pull the elastic through later. I usually mark the opening with pins before I make the tunnel.

7. Measure the length of the 'skirt' you made so far. Divide the length by 3. Take this number and add 1 inch (for 1/2 inch seam allowance on both sides). Cut off that amount of your second fabric.

8. Zigzag the raw edges and stitch the finished edges together with a straight stitch, right sides together.

9. Press a small seam on 1 side of the fabric.


10. Stitch a seam with a straight stitch.


11. Now, slip the second piece you made, inside out, over the first piece (right side out).
In the picture: The tunnel of the first (striped fabric) piece is at the top of the picture,
the bottom seam of the second (flower fabric) piece is at the top of the picture. I left room between the two pieces (oops...), but in order to have 3 equally sized tiers, make sure you line them both up at the top!!


12. Pin the 2 pieces together. In order to not accidentally pin the front to the back I like to put my cutting ruler in between the front and back.


13. Attach the smaller piece to the main skirt with a straight stitch, at about 1/2 inch seam allowance.

14. Turn the skirt inside out and press the top (flower) layer flat.


15. Measure your girl's waist and cut enough elastic (plus some extra) to make the skirt fit comfortably. Pin a big safety pin through the elastic, and pull the safety pin through the tunnel. Pin the ends together with the safety pin and let her try it on before you actually sew it together. Adjust width if necessary.


16. Stitch the elastic together. Make sure it isn't twisted in the tunnel.
Then, close the tunnel by finishing off the part you just pulled the elastic through.


You did it! The skirt is ready to wear!!

Enjoy!

I linked this up to:
Making Photobucket

Pin It

Tuesday, March 9, 2010

Party time!

Pin It

There is something about wrapping gifts that I just love. Matching paper, ribbons and make a card to go with it is just so much fun. Once I have picked wrapping paper, I make a card and just try to match the colors or style.


And, sometimes I just like the colors of the gift itself SO much that I just don't want to 'hide' it. I have found that, in that case, I really like to use clear wrapping paper (cello wrap).


For bigger gift it's sometimes easier to use clear gift basket bags.


Let the party begin!

Pin It