Wednesday, June 30, 2010

Reversible Vinyl Pocket Bib Tutorial

Pin It

I noticed that the bibs we were using for our youngest had started to look kind of gross.
So I was planning on getting some new ones. But then, this weekend, I happened to run into this really cute vinyl material.
It's probably meant to be used as a tablecloth, but I thought I'd give it a try and use it for a bib.

And I am pretty happy with the result, so I wrote this tutorial.

It's pretty simple, and you don't need a lot of supplies, which is my favorite kind of project.
In fact, you might already have the vinyl on hand. You could just use an old tablecloth. The material that I used had a soft-feeling backing, and the front had a little texture to it.

Supplies
  • an old bib to be traced
  • paper to trace it on
  • clear tape (optional)
  • thread
  • vinyl (enough for front and back of bib plus 2 pockets)
  • bias tape
  • piece of velcro
Step by step tutorial
(the numbers refer to the numbers in the picture above.)

1. Take a bib and trace it onto paper. Mark on the sides where the pocket starts.

2. Cut out the bib and the pocket - twice.
(Make sure you do this precisely, it is easier to put the bias tape over the edges if it matches exactly.)

3. Stack the pocket pieces together, with the wrong sides facing each other, so both right sides outside. Put a strip of bias tape around the top edge (the straight edge). I used clear tape to make it stay in place. Then sew the bias tape in place, using a straight stitch, length 3. (For vinyl you don't want the stitch to be too short, since it might rip the vinyl.)

4. Now that the pocket is made, put the bib part together, wrong sides facing again. Put the pocket on top of it and attach with clear tape so that it is in the right place. Then, fold the bias tape around the edge. I like to start somewhere on the top of the bib, where the velcro will be. Sew the bias tape in place with a straight stitch, length 3, working the bias tape around the bib as you go. For me it worked best to go really slow. Try to stay away as far from the edge of the bib as possible while staying on the bias tape, this to prevent ripping later. Keep going till you are getting close to where you started. Cut of the bias tape, and finish off.

5. Attach the velcro pieces to the top ends of the bib.

6. Your bib is done!

The cool thing about this bib is that you can turn the pocket inside out, because the 'back' is made of the same material. If you use it like that, the pocket will stay open, and 'catch' food much better. I always like bibs that have that option!

I linked up to:
Show and Tell Green The Girl Creative

Pin It

Thursday, June 24, 2010

Rose Basket Tutorial

Pin It


Don't you just love to get pretty flowers?
I do, but I always feel sorry when the time comes I have to throw them away.

But my one of my favorite flowers happens to be roses.
And, roses can be dried pretty easily!
I made this rose basket with hardly any supplies,
and roses that would have gone into the garbage otherwise.

Do you want to make a rose basket of your own?

Here is a tutorial, it is really simple!

Supplies:
  • Roses
  • Basket
  • A few sheets of (old) sheet music

1. When you have roses that are getting old, take them out of the vase.
Tie the stems together with a rubber band or twine.
Let the roses dry, by hanging them upside down in a dark place.
(Closet, garage, etc.)

2. Once the roses are dry, you are ready to start your basket.
Get some sheets of sheet music.
If you want it to look old, you can copy it onto tan/yellowish paper.
(This is also a good idea if you want to keep the originals neat.)

Optional: Cut the edges of the paper with deckle scissors and use brown chalk or stamping ink to make the edges of the paper darker.

Wrinkle the paper and kind of straighten it out again.

3. Fill the basket with the papers.

4. Trim your roses to desired length and add to the basket.

I linked up to:

Show and Tell Green

Pin It

Funny

Pin It

Today my husband has a deadline for work,
and he is working from home,
because that is more efficient.
I am doing what I can to keep the kids quiet.
So I told them that they had to be really quiet since daddy is working.

Response of my 5-year-old:
"Daddy is not working, he is crafting!
He has blue, orange and yellow markers!"

I guess working with highlighters must qualify as crafting :)

Pin It

Tuesday, June 22, 2010

Dry Erase Board Tutorial

Pin It

Today I made this cute mini dry erase board.
It is very quick, simple and fun.
And, you don't need a lot of supplies either.

So, let's start!
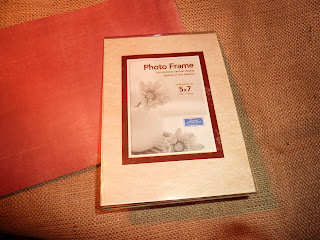
I used a simple plastic 5x7 frame from the Dollar Store.
But you can adjust this to work for any size frame you like.

Other supplies needed:
  • Dry Erase Marker
  • Background paper, same size as frame
  • Burlap, a little smaller than frame (Or other paper. Make sure it is light enough that you can see the text you write on it with a dry erase marker.)
  • Other patterned paper, flowers, ribbon, rhinestones, what ever you can come up with to decorate the frame
  • Adhesive (Glue dots)
Begin by trimming the background paper.
Just cut it the same size as the paper that was in the frame when you bought it.
Next, cut the burlap a little smaller than the frame.
Then, pull out some pieces of burlap to create a fringed edge all the way around.
Adhere the burlap to the background paper.
Now the fun part begins.
Decorate the background with patterned paper, ribbon, etc.
Just make sure that you keep the 'bulky' parts, like flowers, rhinestones, etc. out.
You will glue these on top of the actual frame, not on the background.

Other things you could use are:
* fabric
*lace
*buttons
*beads
etc.

Put the background paper in the frame, and adhere the bulky items to the frame.
I really like to use mini glue dots, they seem to hold up pretty well!
Enjoy your work!
To make sure you will have your dry erase marker always handy, you could use a marker with a magnet in the lid, like the one pictured. Just glue a magnet on the frame, and you will have a place to keep the marker!

This works great to leave little messages for people
(or yourself, if there is something you don't want to forget)

Also, this is something that kids would enjoy to make, too.
They can just pick their own papers and decorations, and use it to draw on.
(Or leave messages for you.)

I linked this up to:
Show and Tell Green Sumo Sweet StuffThe Girl Creative

Pin It

Tuesday, June 15, 2010

Glittery Shells

Pin It

Today we picked up a couple items at the dollar store:

Glitter glue
&
a basket of shells.
I covered the table with paper, and let my girls decorate the shells with glitter glue.
They loved it, and could do it pretty much by themselves.
The only thing I had to show them was how they could use their fingers to spread the glue, sometimes they got a lot in one spot.
They were busy for more than one hour.

We put the shells on paper plates and put them outside in the sun to dry. They were so proud of their glittery shell collection.

The glitter glue was easily washed off their hands with soap and water. They used paper towels while they were working when they got too much stuff on their hands.
I love how simple (and cheap - $2) this craft is. You could do the same with rocks, or maybe use shells that you collected some other time.


Pin It

Wednesday, June 9, 2010

Button Owl Tutorial

Pin It

After making 2 versions of the button bird , I decided to try something else. Since I really like owls, that's my next button creation!

You will need the following paper pieces and buttons as shown in the picture above. I used punches to create these shapes, but you could also cut your own.
Arrange the buttons and feet as shown in the picture above. Adhere. I used foam tape for the buttons, that works especially well if the buttons have a center that is lower than the rest of the button. Also, please note that the top button will be covered up completely, so it doesn't really matter what color it is.
Glue the 2 raindrop shapes together to form the head and adhere to the top button.
Add the beak, eyes and belly.
I thought he was missing something, so I gave him wings.
And then I suddenly thought he could use a branch to sit on. So I went to the yard and collected some small twigs... Then I needed to make another pair of feet, since these needed to be glued on top of the branch.
Then, I added a flower to the branch.

I really like the end result. This would be so cute as a card, for a scrapbook page(although I don't think the twig is acid-free...), in a picture frame as wall art, or glued on the frame itself to make a cute picture frame, or ...

What do you think?

I linked this up to:


Pin It

Graduation Card

Pin It


It's graduation time again, and I realized I don't have any graduation-themed stamps or paper. So, I decided to see if I could come up with a simple graduation card, using supplies I had on hand. I liked how simple it was, and decided to take some pictures so that I could make a tutorial.
You are going to need the following supplies:

1. foam tape
2. black diamond shape (cardstock or shiny paper)
3. black circle shape (same material as item 2)
4. brad
5. (white) cardstock, folded in half (this will be your card)
6. a sheet of (black) paper, slightly smaller than 5
7. strip of (silver) paper
(I embossed items 5&6 using my Cuttlebug embossing folders, but you could also use patterned paper or cardstock.)
8. piece of white paper
9. silver colored yarn

Tools:
  • adhesive
  • paper trimmer
  • scissors
  • needle or other piercing tool
First, assemble the card, as shown in the picture above.Then, cut the circle as pictured above.
Use a needle or other tool to poke a hole in the center of the diamond.
Put the brad in the center of the diamond. Use the foam tape to adhere the diamond to the shape that used to be the circle.
Roll the piece of paper to create the diploma, put a little bit of adhesive on the edge to make sure it doesn't unroll itself. Tie the yarn around it. Trim if necessary.
Use adhesive (I used Glue Dots here) to adhere the diploma and cap to the card.

This worked great, since I didn't need any special supplies or tools to create this card.

Also, the material I used for the cap is just the package that the embossing folder that I used came in. It was nice, shiny and sturdy cardstock, so I thought that would look pretty good. (Good thing you can't see that there is text printed on the back - I assume the graduate won't take my card apart...)

The string I used to tie the diploma is ribbon that was wrapped around a gift.

I always like to see how I can turn 'ordinary' things into craft supplies :)

I linked this up to:


Show and Tell Green

Pin It